Floor

Cork Flooring Installed*

*This post is being written several months after the fact as I am a slacker and haven’t kept up with the blog. My memory may be faulty on some accounts.

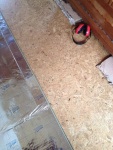
August 16, 2014 – Getting tired of walking on OSB floors and trying to keep them swept, we installed the cork flooring this weekend. We decided to go with cork floors as opposed to wood because we wanted something a little softer on the feet. Pete and I like to cook and it’s not uncommon for us to spend a whole day in the kitchen. We’ve lived in places that had hardwood floors in the kitchen and it didn’t take long before your feet and legs were sore; we thought cork might have a little more give. We also felt the cork offered a tad more r-value than wood flooring.

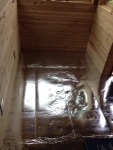
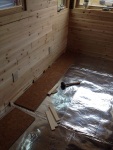
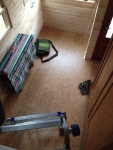
We ordered the flooring from Lowe’s and watched a couple of YouTube videos on how to install it. The cork came in 1/4 inch 3 foot by 1 foot sheets. They lock together and were relatively easy to install. We ran the sheets down along the long side of the tiny house to maximize the amount of flooring. Initially I wanted to run it starting on the short side but that would have required a lot more cutting and we probably would have had to order another box or two of flooring. We ended up needing seven boxes of the flooring and we had a couple of sheets left over. Cost wise we spent around five or six hundred. A vapor barrier has to be installed under the cork and we went with a slightly insulating vapor barrier to make the floor is as warm as possible.

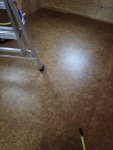
Having been walking on the cork flooring for almost three months I can say we are pleased with our choice. The flooring is more gorgeous than we could have imagined. It was relatively easy to install; by our second to last row we had a system in place and we were able to consider ourselves cork flooring installation experts. It is definitely softer under foot and because of that our temporary folding chairs have left their mark. The small dents are only noticeable in certain light when looking down at an angle. Instead of being upset about the wear and tear I’m telling myself that we’re going for the distressed look.

Stay tuned for more outdated blog posts.

Categories: Floor, Flooring | Tags: , | 4 Comments

We’re Floored!

June 24, 2012 – Our welding was completed last thursday and this weekend we were able to complete the floor.  As I stated in the last post, we had three options for dealing with our subfloor.  We chose option 3, cutting the subfloor so that the edges landed on one of our floor joists. Our first piece, which we only had to cut the tongue off, was pretty easy.  The other sheets, however, had to have the tongue and the groove cut off in addition to cutting it so it landed on a board (the tongue and groove while ideal, is not essential to the subfloor).  We used an aluminum guide that we borrowed from a co-worker (Thanks Brian!) in order to ensure that we were making straight cuts.  This almost worked!  A table saw would have been the ideal tool to use for this project. However, after a few goof-ups, the aluminum guide worked well and we were able to cut all the subfloor pieces and most of the cuts were straight.  We should have only needed 5 sheets of the subfloor; however, we cut our first one a couple of weeks ago when we discovered that not only our porch divider was in the wrong spot but that there may be a mistake in the plans (more on that later).  Anyway, we messed up the first one and had to buy an extra sheet.  Due to a few bad cuts, we thought we were going to need a 7th board; however, we were able to use some leftover cuts to fill in the remainder of the floor.

I was very disappointed last Thursday when I finally opened up one of our boxes of wool insulation.  I had previously been following several tiny house blogs that had all used the wool insulation from Oregon Shepherd and I was able to see the pictures of their insulation.  I had also thoroughly checked out the Oregon Shepherd website before ordering our insulation.  In all the pictures that I had seen, the wool was all natural colored wool.  However, when I had opened up one of our boxes, it contained dyed wool too, something I was not expecting (I admit I am a bit picky).  My disappointment came from the fact that it simply wasn’t the natural look I was wanting.  I had an image in my head regarding what the wool would look like and it was anything but that.  I was pleased to find that the second box we opened was all the natural color, but color or no color, we’re still excited to use wool for our insulation.

After getting all the subfloor sheets cut to size, we filled the cavities with the wool and glued and screwed the subfloor in place.  It was a late night for us, we didn’t finish up until 9:30 pm and still had to make the 1/2 hour drive home and get ready for work the next day.  This was a big milestone for us though.  We started framing in the floor a month and a half ago and it feels really good to complete this phase of the project.

Categories: Floor, Framing, Insulation | 4 Comments

We Make Mistakes…So You Don’t Have To.

June 17, 2012 – Last weekend we began to cut our subfloor when we started to get the feeling that we had made a mistake. Upon further investigation today, it turns out that we made more than one mistake.

Mistake #1 – Our trailer wheel wells are a different size than the trailer featured in our plans. Our plans tell us that the “floor framing may need to be altered to accommodate location of wheel wells”.  In the process of kinda following the plans and kinda not (because the dimensions on the plans did not work with our trailer), we put the boards that divide the front porch area and the entrance to the house in the wrong spot. In the plans, the divider area looked centered between the porch and entry way, so that’s where we put it. Well, it turns out that the divider area goes where the port side wall ends and the door jamb begins. Oops!  No worries, we just used a grinder to cut the corner braces that were glued and nailed into place with ring-shank nails; and a sawzall to cut trough the ring-shank nails that held the boards in from the ends. After that, we cut new boards (luckily we had some scrap that was long enough) and put them in the correct location.

Mistake #2 – Again, because we had to modify our floor framing plans to accommodate our different sized wheel wells, we failed to understand the importance of placing floor joists 16 inches on center (something the plans don’t mention).   We framed our floor in three sections and we evenly spaced the floor joists within each section. It wasn’t until we were getting ready to lay the subfloor that we realized why such details are important.  It turns out, that if you place your boards 12, 16, or 24 inches on center, when you lay down a 4′ x 8′ sheet of subfloor it lands nicely on a floor joist and can be nailed down properly.  Oops again!  We have three options to correct the situation:

Option #1 – Place extra boards in the floor frame in the correct locations.

Option #2 – Move existing boards to the correct location.

Option #3 – Cut the subfloor so that it lands on an existing board.

We’re leaning toward option #3.

I’ll shortly be adding my brother Chris to my speed dial, as he has been invaluable to our building project.  He has taken numerous phone calls and Skype sessions to help walk us through details and remedy our goof ups. After the last phone call today when I told him how frustrating of a day it had been, he kindly told us that this will be one of many frustrating days and that any mistakes we make can be fixed.  I had been starting to fear that at the end of this project we would wind up with a house unfit to live in, but as long as Chris keeps answering his phone, I think we’ll be okay.

Categories: Floor, Framing | 5 Comments

Aluminum Flashing Complete

July 9, 2012 – We decided to install the aluminum sheathing this weekend after all. We spoke with our welder and he said we would be fine to sheath the floor and put it back on the trailer as long as we prop it up a bit for the welding phase. We had previously purchased a 50′ roll of 24″ wide aluminum sheathing for the underside of the floor; however, after doing some quick mental math, I decided that wouldn’t quite be enough. We stopped by ProBuild this morning and picked up another roll of aluminum sheathing, this time a 16″ x 50′ roll and 5 sheets of 3/4 inch subfloor material.

At the urging of our off-site project manager, we installed a vapor barrier on the underside of the floor to keep the floor a bit warmer.  It was pretty easy, we just rolled it out, stapled it in place, and trimmed the edges.  This was followed by the aluminum sheathing. We used construction adhesive along the outside edges where the aluminum sheathing came in contact with the floor frame and some sort of sealant by Geocel to seal the seams between the sheets of aluminum. We put in staples all along the edge of the floor very tightly spaced to keep all critters out. I probably got a little carried away with the spacing of the staples, but not as carried away as Pete and Jeff.  We only needed to staple along the edges and let the sealant do it’s job between the sheets of aluminum; however, Pete and Jeff felt the need to not only staple along all the floor boards but also to tape the seams with duct tape.  This almost meant a trip to the hardware store, however, Jeff had several partial rolls lying around the house. The job was almost finished when the second roll of duct tape ran out, but have no fear, Jeff managed to find a roll of blue and white polka-dotted duct tape. Nothing like a little piece of flair for the tiny house, even if it is on the underside and will never be seen again.

Between Jeff, Cindy, Pete and I, we managed to get the floor back onto the trailer.  At this point, we started working on the subfloor and cutting pieces to size; however, we quickly realized that our brain power was spent and it was time to call it a day.

Next up: Welding


Categories: Floor | 4 Comments

New Construction Site – Here We Come

June 8, 2012 – At the end of July, our lease is up and our landlord will be moving back into her home. We didn’t want to get too far along on the tiny house knowing that we’d have to relocate so we packed up the tools and hitched up the house. Speaking of tools, Jay Shafer – the creator of the Tumbleweed Tiny Homes, claims only 14 tools are needed to build a tiny house. While we thought we were going to have to borrow tools from everyone we know, it turned out that between us and my mom we had all 14 (we did borrow a nail gun from a co-worker). A big thank you goes out to my mom for letting us raid her basement for all things useful to the project. Thanks mom!

Once we got the trailer hitched to the truck we realized we had a small problem. The trailer came with drop down supports at the back of the trailer. When we first brought the trailer home, we dropped the supports and built the floor. It wasn’t until today that we realized not only would the supports not come out, but that we also could not put them back in the upright position because the floor was now in the way. We discussed grabbing the grinder and cutting them off, but for some reason instead we decided to drive the trailer up to a small hill in the yard so that the supports would fall out. To make a long story short, it all worked out in the end, but really we should have just cut the darn things off. At one point the trailer and the truck were wedged between the barn and a spruce tree and no amount of going forward or backwards was helping the situation.  While one of the supports did come out, the other one was still on and being driven into the ground as Pete tried to maneuver the trailer.  Like I said, it all worked out in the end.

Our new construction site is in the driveway of our friends Jeff & Cindy Noble. Jeff and Cindy were kind enough to let us move the project to their house and we are so very grateful for their hospitality. Thanks Jeff & Cindy!  We’ll see how they react when we ask to live there permanently!  🙂

We had hoped to be super productive this weekend. We anticipated getting the welding done and the floor sheathed with the aluminum; however the welding supplies that we thought would be in stock were not and we are having to order materials. We did manage to get the VERY heavy floor off the trailer and stored in the garage. Just in time too! As soon as we got the floor off the rain came down.


Categories: Floor, Trailer, Welding | 10 Comments

Floor Framing Complete

May 26, 2012 – After a quick run into town to exchange some lumber and hit the farmer’s market, we finished framing in the floor of the tiny house.  We had been going back and forth on whether to build the floor in one section or three sections.  The plans call for the floor to be built in one piece; however, we knew the two of us wouldn’t be able to pull it off the trailer without quite a few extra hands. In the end, we decided on building the floor in one section and are now hoping that we can find some folks to help us pull the floor off so we can aluminum sheath the underside and get the welding done. We’ll then need help again to put the floor back on.  It’s slow, but progress is being made!

Categories: Farmer's Market, Floor, Framing | 10 Comments

Blog at WordPress.com.